I remember staring at a pile of assorted plumbing fittings in Home Depot, completely bewildered. My sink was draining slower than molasses in January, and I’d decided to tackle the fix myself. The internet told me I needed a P trap. Easy enough, right? Wrong. Suddenly, I was faced with a dizzying array of plastic and metal, and the term ‘slip joint’ kept popping up. It made me wonder: are slip joints required on P traps, or is it just another plumber’s fancy term for something I don’t need?
Honestly, plumbing can feel like a secret club. You hear jargon, see weird shapes, and wonder if you’re about to make things ten times worse. This whole P trap business, especially with those elusive slip joints, felt like the first hurdle in a very expensive DIY obstacle course.
What the Heck Is a Slip Joint on a P Trap Anyway?
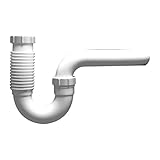
Let’s cut to the chase. A P trap is that U-shaped pipe under your sink. Its main job is to hold a bit of water, creating a seal that stops sewer gases from wafting up into your living space. Pretty vital, right? Now, the ‘slip joint’ part refers to a specific type of connection used on some P traps, particularly those made of plastic. Think of it as a compression fitting, but designed for ease of use and, importantly, for making connections that you might need to take apart later without a wrestling match.
These slip joints usually consist of a threaded nut and a tapered plastic washer, called a ferrule or a slip nut washer. You slide the nut over the pipe, then the washer with its tapered side facing the fitting it’s connecting to. When you tighten the nut, it compresses the washer against the fitting, creating a watertight seal. The ‘slip’ part comes from the fact that the nut and washer can easily slip over the pipe before being tightened, allowing for some flexibility and easy assembly. It’s not rocket science, but it’s a smart bit of engineering that makes plumbing a lot more accessible for us home tinkers.
I’ve dealt with both types of P trap connections – the kind you glue permanently and the kind with these slip joints. The slip joint versions are a lifesaver when you know you might need to get back in there.
I learned this the hard way. A few years back, I replaced a sink and used the glued-in type of P trap because it seemed more permanent and thus, better. Six months later, I dropped a tiny earring down the drain.
Guess who spent an hour trying to cut a perfectly good glued trap out of the wall? If I’d used a slip joint, I would have just unscrewed it, retrieved my earring, and screwed it back together. Live and learn, right?
So, to answer the big question: are slip joints required on P traps? No, they aren’t required in the sense that a P trap itself is required to prevent sewer gas. You can get P traps that are designed for solvent welding (gluing), which creates a permanent, unmoving connection. However, for most residential sink and tub applications, especially if you anticipate needing to access the trap for cleaning or repairs, slip joints are the overwhelmingly common and practical choice. They offer convenience without sacrificing the key function of the trap itself. You’ll find them on most pre-assembled plastic P trap kits sold at hardware stores.
When Does a Slip Joint Make Sense (and When Does It Not)?
This is where the rubber meets the road, or rather, where the plastic meets the pipe. Slip joints are your best friend for a few key reasons. Firstly, they are incredibly easy to install and remove. No special tools, no messy glue. You just hand-tighten them, and they create a reliable seal. This makes them perfect for DIYers who aren’t plumbing pros. If you’re replacing an old P trap, or installing a new sink where you might want to get under there again someday (and trust me, you probably will), slip joints are the way to go.
Think about cleaning out a clog. If you have a glued trap, you’re basically cutting it out and then gluing in a new one, which is a whole different ballgame requiring primer and cement. With a slip joint, it’s a simple unscrew, clear the debris, and screw it back together. I did this just last month for a client whose garbage disposal was backing up into the sink. Took me five minutes to disassemble the P trap, clear out a nasty wad of food scraps, and reassemble. No fuss, no mess, no need for a trip to the store for more parts.
However, there are situations where slip joints aren’t ideal. For one, they can sometimes be more prone to leaking over time than a properly glued joint, especially if they aren’t tightened correctly or if the plastic washers become brittle with age. I’ve had to retighten a slip joint nut once or twice over the years on older installations. Also, if you’re dealing with a situation where the pipes are under significant stress or movement, a glued joint might offer a more rigid and secure connection. For instance, in some commercial applications or in areas prone to vibrations, you might see solvent-welded traps. (See Also: Are Omega Watch Straps Real Alligator )
Another consideration is temperature. Extreme heat or cold can potentially affect the plastic components of a slip joint over a very long period, though this is rarely an issue in a typical home environment. For most standard bathroom and kitchen sinks, the convenience and ease of maintenance offered by slip joints far outweigh any minor potential drawbacks. They are also typically less expensive than the individual components needed for a solvent-welded setup, especially if you factor in the primer and cement.
Here’s a quick rundown of when to lean on slip joints:
| Scenario | Slip Joint Verdict | Reason |
|---|---|---|
| DIYer installing new sink | Highly Recommended | Easy to assemble, no special tools or glues needed. |
| Replacing an old P trap | Highly Recommended | Allows for quick disassembly and reassembly. |
| Frequent cleaning or clog clearing needed | Ideal | Makes access simple and fast. |
| Permanent, undisturbed installation | Optional, but glued is also fine | Glued joints are very secure, but slip joints are still effective. |
| Areas with extreme temperature fluctuations | Consider glued | Potential for plastic to degrade over long periods (rare). |
The Plumbing Code and Your P Trap: What You Need to Know
Now, let’s talk about the ‘rules.’ When people ask if slip joints are required, they’re often wondering if the plumbing code mandates them. The short answer is no, the code doesn’t specifically require slip joints. What the code does require is a functional P trap that creates a proper water seal and prevents sewer gas from entering the building. It also specifies materials and proper installation methods to make sure a watertight and durable system.
Different plumbing codes (like the International Plumbing Code, or IPC, which is widely adopted) will have sections detailing trap requirements. They’ll talk about the trap seal depth (typically 2 inches), the need for smooth and easily cleanable surfaces, and the types of connections permitted. Plastic slip joint fittings are generally accepted by code for drains serving sinks, tubs, and similar fixtures, provided they meet certain standards and are installed correctly. The key is that the connection must be watertight and remain so under normal operating conditions. The slip joint mechanism achieves this through compression, as long as it’s properly assembled.
The International Plumbing Code, for example, allows the use of plastic tubing for traps and waste pipes, and the common slip joint connections are a standard way to assemble these plastic trap assemblies. The code is more concerned with the outcome – a sealed, functional trap – than the specific method of connection, as long as that method is reliable and safe. You’ll often see references to standards like ASME A112.4.3 for plastic fittings, which these slip joint components must meet.
Where you might run into issues is if you’re using improper materials or techniques. For instance, if you tried to use a type of flexible hose that’s meant for something else, or if you didn’t use the correct slip nut and washer with your P trap pipe, that would likely be non-compliant. The slip joint is a system, and using all the parts as intended is what makes sure it meets code. If you’re ever in doubt, or if you’re doing work in a jurisdiction with very strict inspections, it’s always a good idea to consult your local building department or a licensed plumber. They can clarify specific requirements that might apply in your area, though for typical residential sink replacements, a standard plastic slip joint P trap kit is almost always code-compliant.
I once had an inspector question a specific brand of slip joint washer because they looked a bit different from the standard ones. He pulled out his phone and looked up the manufacturer’s specs to confirm it met the ASME standard. It took an extra five minutes, but it passed. So, while the type of connection isn’t mandated, the quality and compliance of the components certainly are.
Common Mistakes When Dealing with P Traps and Slip Joints
Alright, let’s talk about where people screw this up. Because even with something as seemingly simple as a slip joint P trap, there are ways to make a mess of it. One of the biggest mistakes I see is overtightening the slip nut.
People think ‘tighter is better,’ so they crank on it with a wrench. This is a plastic fitting, folks! You can crack the nut, strip the threads, or even deform the washer, which will absolutely cause a leak. The goal is to compress the washer, not to Hulk-smash it into submission.
Hand-tight plus a quarter turn with channel locks or a pipe wrench is usually plenty. Feel for resistance, then give it a little more. (See Also: Are Traditional Mouse Traps Humane )
Don’t go ape.
Another common blunder is forgetting or misplacing the slip joint washer. This little plastic ring is the heart of the seal. If you lose it, or if it falls off and you don’t notice, you’re going to have a leaky trap. I’ve seen people try to make do with plumber’s tape or silicone caulk on a slip joint connection, which is a recipe for disaster. Those are temporary fixes at best and will likely fail, leading to water damage. Always make sure you have that washer, and that it’s oriented correctly – the tapered side should face the fitting you’re connecting to.
People also sometimes mix and match parts from different P trap kits or manufacturers. While many slip joint fittings are somewhat universal, there can be slight variations in thread pitch or washer design that can prevent a good seal. It’s always best to use all the components that came with a single kit, or at least make sure that any replacement parts are explicitly compatible with your existing setup. I had a buddy try to connect a metal P trap tailpiece to a plastic sink drain using a plastic slip joint kit. It worked for about a day before it started weeping water because the expansion rates of metal and plastic are different, and the seal wasn’t designed for that combination.
Finally, and this is a big one, people forget to test their work. After you’ve installed your P trap and tightened everything up, you’ve got to run water. Fill the sink all the way up, then let it drain quickly. Watch for drips.
Check all the connections – where the trap connects to the sink tailpiece, where the trap connects to the drainpipe in the wall, and all the slip joints in between. If you see even a tiny drip, tighten that joint a little more. If it still leaks, you might have a cracked part, a missing washer, or an improperly seated washer.
Don’t just assume it’s fine because you don’t see a gushing leak; a slow drip can cause serious long-term damage to your cabinets and floor.
| Mistake | Consequence | Fix/Prevention |
|---|---|---|
| Overtightening slip nut | Cracked nut, stripped threads, deformed washer, leaks | Hand-tighten plus a small turn with a tool; don’t force it. |
| Missing/misplaced slip joint washer | No seal, constant leak | Use all provided parts; make sure washer is present and correctly oriented. |
| Mixing parts from different kits | Incompatible threads/washers, persistent leaks | Use parts from the same kit or confirm compatibility. |
| Not testing for leaks | Water damage to cabinets/flooring | Run water and check all connections thoroughly after installation. |
Real-World Use: When I’d Absolutely Choose Slip Joints
Look, I’m not saying glued traps are bad. For certain permanent installations, like behind a wall where you’ll never, ever need to access it, a glued trap is totally fine and probably even more solid against accidental bumps. But for 95% of what people do under their sinks, especially in a home setting, slip joints are just superior. Why? Because life happens. Things clog. Things need cleaning. Things break.
I’ve got a P trap under my kitchen sink that’s probably been taken apart and put back together half a dozen times in the last five years. First, it was a clogged disposal. Then, a dropped utensil that I managed to retrieve. Last year, the washer finally started to get a bit stiff, so I replaced just the washer and nut assembly for about $3. If that had been a glued trap, I would have been looking at a much bigger repair job, potentially involving cutting into the wall or replacing a larger section of pipe. The cost savings and the sheer convenience are undeniable.
When I’m advising friends or family on DIY projects, my advice is almost always to go with a slip joint P trap kit. It reduces the potential for error, makes maintenance a breeze, and saves them the headache of dealing with plumbing cement. I remember my sister-in-law calling me in a panic because her bathroom sink was gurgling and smelling awful.
She’d never plunged a drain before and was terrified of making it worse. I told her to grab a cheap slip joint P trap kit from the hardware store. She was able to unscrew the old one, clean out a massive hairball that was the culprit, and reassemble it herself in under 10 minutes, all without a single drop of glue. (See Also: Are Sticky Mouse Traps Humane )
She was so proud of herself, and honestly, so was I. It’s helping when you can fix something simple yourself, and slip joints make that possible.
My own home is a testament to this. Every sink, every toilet, every shower trap that I’ve installed or replaced in my own house has a slip joint if it’s an exposed trap. It’s not about being lazy; it’s about being practical. It’s about saving myself time and money down the line. It’s about having the confidence that if a problem arises, I can usually tackle it with basic tools and minimal fuss. So, if you’re asking me from one person who’s been there to another, for almost every home application, the answer to ‘are slip joints required on P traps?’ is that they are highly, highly recommended for ease of use and future maintenance.
Faq: Your P Trap Questions Answered
Do I Need Plumber’s Tape with a Slip Joint?
No, you generally do not need plumber’s tape (PTFE tape) when using a slip joint P trap. The seal is created by the compression of the plastic washer against the fitting as the slip nut is tightened. Plumber’s tape is typically used on threaded pipe fittings where metal-to-metal or metal-to-plastic threads are directly engaged without a compression washer system.
Can I Reuse an Old Slip Joint Nut and Washer?
It’s strongly advised not to reuse old slip joint nuts and washers, especially if they’ve been in place for a long time. The plastic can become brittle, cracked, or deformed, compromising the seal. Always use new nuts and washers that come with a new P trap kit or are purchased specifically as replacement parts. They are inexpensive, and using new ones is the best way to make sure a watertight connection.
What Happens If I Overtighten a Plastic P Trap?
Overtightening a plastic P trap, particularly the slip joint nuts, can lead to several problems. It can crack the plastic slip nut or the fitting it connects to. It can also crush or deform the plastic slip washer, preventing it from creating a proper seal, thus causing leaks. In severe cases, it can strip the threads, making it impossible to tighten properly. Always tighten by hand until snug, then give it just a slight turn with a tool, checking for leaks.
How Tight Should Slip Joints Be?
Slip joints should be hand-tightened until snug, then usually an additional quarter to half turn with a tool like channel locks or a pipe wrench. The goal is to compress the plastic slip washer sufficiently to create a watertight seal without deforming or cracking the plastic components. You should feel resistance when hand-tightening; don’t force it. If you’re unsure, tighten it gently and then check for leaks by running water. You can always tighten a little more if needed, but you can’t un-crack a cracked fitting.
Can You Use Metal Slip Joints?
Yes, metal slip joints exist, particularly for brass or chrome-plated P traps and tailpieces. The principle is the same – a threaded nut and a washer (often made of rubber or neoprene for metal fittings) compress to create a seal. They are common in older plumbing or for decorative fixtures where a metal finish is desired. The installation process is very similar to plastic slip joints, but be mindful of the material – don’t overtighten, as metal can also be damaged.
Conclusion
So, are slip joints required on P traps? The simple, honest answer is no, they aren’t a technical mandate. You can get traps that are glued permanently. But in the real world, for most of us dealing with sinks and drains in our homes, slip joints are the unsung heroes of easy plumbing. They make installation a breeze and future maintenance practically painless.
My advice? Unless you have a very specific reason to go for a glued trap – perhaps a highly specialized or permanent installation behind a wall – just grab a slip joint P trap kit. You’ll save yourself headaches, potential water damage from difficult repairs, and the satisfaction of knowing you can handle a common household plumbing issue yourself. It’s the practical choice for the practical homeowner.
Next time you’ve got a slow drain, don’t be intimidated. Grab the right kit, and remember that ease of assembly often trumps permanent installation when it comes to traps.