I remember the first time I tried to replace a P trap under my kitchen sink. It was a Sunday afternoon, the garbage disposal had just decided to stage its own rebellion, and water was starting to pool ominously. I’d seen plumbers do it a hundred times, and it looked simple enough. Then I hit a wall. I was twisting and pulling, convinced the thing was just jammed, before a nagging thought started to creep in: are P traps reverse threaded? It felt like a trick question, one that someone, somewhere, had probably made a killing selling a special tool for.
The frustration was real, and the water wasn’t going to stop itself. This is where a lot of DIY plumbing advice online just makes you angry. They gloss over the simple stuff, the things that actually trip you up when you’re elbow-deep in gunk and trying to avoid calling a professional for a fifteen-minute job. So, let’s cut through the noise and get to the brass tacks.
The Big Misconception: Are P Traps Reverse Threaded?
Alright, let’s get this out of the way right now, because it’s the question that probably landed you here: are P traps reverse threaded? The short, blunt answer is no. Most P traps, the U-shaped pipe under your sink or toilet designed to hold water and block sewer gases, are threaded the standard, intuitive way. Righty-tighty, lefty-loosey. If you’re wrestling with one, trying to unscrew it by turning it counter-clockwise, and it feels like it’s welded on, it’s probably not a reverse thread issue. It’s usually just old gunk, dried pipe dope, or a really stubborn slip nut that’s making life difficult.
I learned this the hard way, wasting about 20 minutes of precious weekend time twisting a plastic P trap in every direction imaginable. I was convinced I was missing some obscure plumbing secret. I even started Googling ‘special P trap removal tools’ like some kind of gullible idiot. The reality? It was just stuck. It had years of hair, soap scum, and God-knows-what-else fused into the threads. My initial assumption that it must be some kind of special threading was completely wrong, and honestly, a little insulting to my own practical intelligence.
Why does this myth even exist? I think it’s a combination of a few things. First, plumbing parts can be intimidating. People see pipes and fittings and assume there’s a hidden complexity. Second, some very specific, specialized industrial or very old fixtures might have had reverse threads for a particular reason, but for the standard sink or toilet P trap you buy at Home Depot or Lowe’s today? Nope. It’s just regular threading. Your struggle is likely due to aged-on grime or overtightening during installation, not some deliberate design to make you curse the heavens. The common advice is to just yank harder, but that’s usually a bad idea and can lead to cracks or bigger problems.
So, when you’re faced with a stubborn P trap, don’t waste your energy trying to find a left-handed wrench. Instead, focus on the real culprits: seizing due to corrosion, dried-on pipe sealant, or simply being screwed on too tight by a previous installer who might have thought ‘more is better.’ Patience and a little targeted persuasion are usually the key, not a change in your fundamental understanding of screw threads. It’s the kind of thing that, once you know it, you feel a bit foolish for ever doubting it, but that’s how you learn this stuff.
What’s Actually Going on Under There: The Anatomy of a P Trap
Okay, so we’ve established that P traps aren’t reverse threaded. Great. But what is going on under your sink? Understanding the basic mechanics of a P trap is half the battle when it comes to troubleshooting or replacing one.
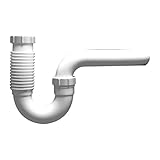
The ‘P’ shape is deliberate, folks. That curve is designed to hold a small amount of water permanently. This water acts as a seal, a liquid barrier that stops nasty sewer gases – you know, the kind that smell like a combination of rotten eggs and despair – from wafting up into your living space.
Without that water seal, your bathroom or kitchen would smell like a backed-up sewer line, and nobody wants that. It’s a simple, elegant, and ancient piece of plumbing engineering.
The P trap assembly itself is usually pretty straightforward. You’ve got the trap arm, which is the horizontal pipe coming out of the wall or floor from the main drain line. This connects to the P trap body, the distinctive U-shaped piece. Then, there’s usually a slip nut on the underside of your sink’s drain flange (the metal ring you see inside the sink basin), which connects to the tailpiece – the vertical pipe extending down from the sink drain. All these pieces thread together, usually with plastic or metal slip nuts and washers, to form a watertight seal. When you’re doing a replacement, you’re basically unscrewing these slip nuts, removing the old trap, and then reassembling with new parts.
The materials can vary. Most modern residential P traps are made of plastic (ABS or PVC), which is relatively cheap, lightweight, and easy to work with. Older homes might have cast iron or brass traps, which are more durable but also heavier and can be prone to corrosion or cracking over time if not maintained. Knowing what material you’re dealing with can sometimes give you clues about how it might behave. Plastic is more forgiving; metal can be brittle when corroded. (See Also: Are All P Traps The Same Size )
The common mistake here isn’t usually the threading, but the sealing. When you’re putting a new P trap on, or even just re-tightening an old one, the washers are key. These are usually rubber or plastic rings that sit between the threaded parts. If they’re missing, cracked, or not seated properly, you’ll get leaks.
It’s not uncommon for people to overtighten plastic fittings, thinking they need to be super secure, and end up cracking the plastic or squishing the washer out of place. Conversely, not tightening enough means you’ll have a slow drip.
It’s a delicate balance, and sometimes it takes a bit of trial and error to get it just right. This is where I’ve made my own mistakes, rushing the process and ending up with a damp cabinet. One time, I was so focused on getting the nuts tight that I didn’t notice one of the washers had folded over.
Water started seeping out almost immediately, and I had to take it all apart again.
Common P Trap Materials and Their Quirks
| Material | Pros | Cons | My Verdict |
|---|---|---|---|
| Plastic (ABS/PVC) | Inexpensive, lightweight, easy to cut/fit, corrosion-resistant. | Can become brittle with age/UV exposure, less durable than metal. |
The go-to for most DIYers for a reason. Cheap and cheerful, but watch out for cracks on older ones. |
| Cast Iron | Extremely durable, long-lasting, resistant to heat. | Heavy, prone to rust/corrosion if not coated, can be expensive. |
Built like a tank. If you have it, treat it well. Not usually a DIY replacement material unless you’re very experienced. |
| Brass | Corrosion-resistant, durable, looks good (if polished). | Can be expensive, susceptible to mineral buildup. |
Often seen in more upscale installations. Works well, but you’re paying for the finish and longevity. |
The Real Reason Your P Trap Leaks (it’s Not the Threads)
Let’s talk leaks. This is the most common P trap problem, and it’s almost never because the threads are stripped or reversed. If your P trap is weeping, dripping, or actively flooding, you need to look at a few other suspects. The most frequent offender is the humble slip nut and washer combination. When you install a new P trap, or reassemble an old one, those plastic or rubber washers are your best friends. They create the seal.
The problem is, these washers can dry out, crack, get distorted, or simply not seat correctly. If a washer is old and brittle, it won’t flex to create a tight seal. If it’s new, it might have been installed crooked, folding over itself. This is a super common mistake for beginners. You tighten the nut, thinking you’ve got it, but the washer has bunched up, leaving a tiny gap for water to escape. I’ve had to take apart a newly installed P trap three times before I got the washer seated perfectly. It’s infuriating when you think you’re done, only to see a persistent drip.
Another major culprit is overtightening. With plastic P traps, it’s tempting to crank down on those slip nuts. You think a tighter nut means a better seal, right? Wrong. Plastic has its limits. Overtightening can actually crack the fitting itself or compress the washer so much that it deforms and loses its sealing ability. It’s like trying to seal a jar with a faulty lid – you can twist it as hard as you want, but it’s still going to leak if the seal is bad. The trick with plastic is to get them snug, then give them just a little bit more turn. You want them secure, not Herculean. (See Also: Are Ant Traps Safe For Babies )
Then there’s the issue of damaged threads or fittings. While the threads themselves aren’t reverse threaded, they can get damaged over time. If a fitting has been cross-threaded during a previous installation, or if the plastic has become so degraded it’s brittle, you might have a leak that no amount of tightening will fix. In these cases, the entire section of pipe, or sometimes the whole trap assembly, needs to be replaced. Inspect the threads on both the pipe and the nut for any visible damage, gouges, or signs of corrosion (if it’s metal). Sometimes, even if the threads look okay, the plastic can have microscopic cracks that aren’t immediately obvious but will allow water through.
Finally, don’t forget the tailpiece coming down from the sink drain itself. If that connection is loose, or if the tailpiece itself is cracked, you’ll get leaks that can look like they’re coming from the P trap. Always trace the water back to its source. A little bit of paper towel can help you pinpoint the exact location of the drip.
The Contrarian View: When to Just Replace the Whole Thing
Here’s my controversial take: most of the time, if your P trap is giving you grief – leaking, clogged, or just looking ancient and gross – just buy a new one. They are ridiculously cheap. I mean, we’re talking about $10-$20 for a basic plastic kit. Why spend hours trying to salvage a questionable old pipe that might crack next week, or wrestling with stubborn, corroded fittings, when you can have a brand-new, pristine trap installed in under 30 minutes for the price of a couple of fancy coffees?
Everyone wants to be the hero who fixed a stubborn problem with ingenuity. But in plumbing, especially with something as fundamental as a P trap, ‘good enough’ often isn’t. I used to be the guy who’d try to clean out every little bit of gunk, replace just one washer, and hope for the best. Then I’d find myself back under the sink a few months later, doing the exact same dance. It’s a false economy. The time you spend, the frustration you endure, and the increased risk of a bigger leak down the line just isn’t worth saving a few bucks on a new plastic trap.
Think about it. If your P trap is old, the plastic might be brittle. The threads could be worn. The nuts might be seized. Even if you manage to get it apart and reassemble it, there’s no guarantee it’ll hold. You’re putting a lot of trust in components that have been subjected to years of hot water, detergents, and who-knows-what-else. For the cost of a new one, you get peace of mind, a perfect seal, and the satisfaction of knowing you’ve got a fresh start.
My turning point came after a particularly nasty leak under my bathroom sink. I spent an entire Saturday morning trying to get an old metal P trap to stop dripping.
I replaced washers, cleaned threads, even used pipe dope. It held for about 48 hours.
Then, a slow leak turned into a steady drip, and I came home to a soggy cabinet floor. I threw the old trap in the trash that night and bought a new plastic one the next morning. It took me 15 minutes to install, and it hasn’t leaked a drop since.
That $15 plastic trap saved me hours of future headaches and the potential cost of water damage. So, unless you’re dealing with a very specific, high-end fixture that you can’t easily replace, my advice is simple: if it’s old and leaky, chuck it and get a new one.
Practical Tips for P Trap Installation and Maintenance
Alright, let’s get practical. You’ve decided to tackle that P trap yourself, or maybe you’re doing some routine maintenance. Here’s how to make it as painless as possible. First, gather your supplies. You’ll need a new P trap kit (make sure it’s the right size for your drainpipe diameter – usually 1 1/4 inch for sinks, 1 1/2 inch for tubs), a bucket, some old towels or rags, and possibly a pair of channel-lock pliers or a pipe wrench if the nuts are really stuck. Don’t get a fancy, oversized wrench; simple channel locks are usually best for the plastic nuts. (See Also: Are Flexible P Traps Good )
Step-by-Step P Trap Replacement:
- Prep the Area: Place your bucket directly under the P trap to catch any residual water. Have your towels ready.
- Loosen the Nuts: Identify the slip nuts connecting the P trap to the tailpiece from the sink and the trap arm going into the wall. Turn these nuts counter-clockwise by hand. If they’re too tight, use your channel-lock pliers, but be gentle with plastic fittings.
- Remove the Old Trap: Once the nuts are loose, the old P trap should come apart. Gently wiggle it free, letting any remaining water drain into the bucket.
- Clean the Connections: Wipe down the tailpiece and the trap arm where the new P trap will connect. Remove any old gunk or residue.
- Install the New Trap: Assemble the new P trap according to the manufacturer’s instructions. Make sure the rubber or plastic washers are seated correctly inside the slip nuts. Hand-tighten the nuts first.
- Check Alignment: Make sure the trap is aligned properly and not putting undue stress on any connections.
- Final Tightening: Once everything is aligned, snug up the slip nuts. For plastic, a firm hand-tighten plus about a quarter to half a turn with pliers is usually sufficient. Do NOT overtighten.
- Test for Leaks: Turn on the water and let the sink fill up a bit, then drain it. Carefully inspect all connections for any signs of dripping or seepage. If you see a leak, try tightening the nut a tiny bit more. If it persists, you may need to disassemble and recheck the washer seating.
A word on pipe dope and Teflon tape: for standard plastic P trap slip-nut connections, they are generally not needed or recommended. The washers and the snug fit of the nuts are designed to create the seal. Using pipe dope on these connections can actually interfere with the seal or make it harder to disassemble later. Stick to the washers. If you’re dealing with threaded metal pipe connections elsewhere in your plumbing, then yes, use Teflon tape or pipe dope as appropriate.
Regular maintenance involves occasionally flushing the trap with hot water to help break down grease and soap scum. If you notice a slow drain, it’s often a sign that gunk is building up in the trap. A simple flush might clear it, or you might need a drain snake or a plumber’s helper (plunger). Avoid using harsh chemical drain cleaners if possible; they can damage pipes and are bad for the environment. Hot water and mechanical methods are usually safer and more effective in the long run.
People Also Ask: Your P Trap Questions Answered
How Do I Know If My P Trap Is Bad?
If your P trap is leaking water from its connections, that’s a clear sign it’s bad or improperly installed. You might also notice persistent foul odors coming from your drains, which indicates the water seal is compromised or not present. Sometimes, a P trap can become clogged with debris, leading to slow draining or standing water in the sink.
Can You Clean a Clogged P Trap Without Removing It?
Yes, you can often clean a clogged P trap without removing it, especially for minor clogs. First, try running hot water down the drain. If that doesn’t work, use a plunger to create suction and dislodge the clog. For more stubborn clogs, a drain snake can be fed into the trap to break up or pull out debris. Chemical drain cleaners are an option but should be used cautiously as they can damage pipes and are environmentally harmful.
What Happens If You Don’t Have a P Trap?
If you don’t have a P trap installed, your home would be exposed to unpleasant and potentially harmful sewer gases. The water seal in the trap prevents these gases from rising from the sewer system into your living spaces, which is important for sanitation and preventing foul odors. Without it, your bathrooms and kitchen would smell constantly of sewage.
Do All Sinks Have P Traps?
Yes, virtually all plumbing fixtures that connect to a sanitary sewer system, including sinks, showers, and toilets, are required by building codes to have a P trap. This is a fundamental component of modern plumbing designed to maintain a sanitary environment by blocking sewer gases.
How Long Should a P Trap Last?
The lifespan of a P trap can vary significantly depending on the material and environmental conditions. Plastic P traps can last for many years, often 20-30 years or more, but can become brittle with age or crack due to physical impact. Metal P traps (brass, cast iron) can last much longer, potentially 50 years or more, but are susceptible to corrosion and mineral buildup over time. Regular inspection for leaks or damage is more important than a fixed lifespan.
Final Verdict
So, to circle back to the burning question: are P traps reverse threaded? Absolutely not. If you’ve been struggling with one, the issue is almost certainly a seized nut, degraded washer, or some other mundane mechanical problem, not some esoteric thread design. My own little plumbing epiphany on this saved me a lot of future aggravation. Remember, for the few dollars they cost, replacing an old, leaky, or suspect P trap is almost always the smarter move than trying to revive it.
Don’t be afraid to get your hands dirty, but also don’t be afraid to admit when a part is just past its prime. A fresh P trap installation takes less time than you think, and the peace of mind is well worth the minimal investment. Next time you’re under the sink, give yours a quick once-over. If it looks ancient, crusty, or you’ve had to jimmy with it more than once, do yourself a favor and swap it out.
It’s a simple fix for a surprisingly common problem, and understanding the basics means you won’t fall for the myth of the reverse-threaded P trap ever again. Now go forth and conquer that plumbing!