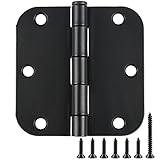
I swear, the last time I tried to replace a broken hinge on my pantry door, it felt like I was trying to solve a Rubik’s Cube blindfolded. I grabbed what looked like a perfectly good hinge from the big box store, only to find it sat proud of the door frame like a sore thumb. It got me thinking: are hinges interchangeable between brands? It’s a question that’s probably cost folks a lot of wasted time and a few muttered curses. I’ve learned the hard way that ‘close enough’ often means ‘completely wrong’ when it comes to these metal workhorses.
For years, I just assumed if it looked the same, it would work. Big mistake. Huge. This isn’t like swapping out a lightbulb; there are subtle, yet important, differences that separate a smooth operation from a frustrating mess. So, let’s cut through the confusion and get to the bottom of whether you can actually mix and match hinges from different manufacturers.
The Devil’s in the Details: Why Your ‘same Old’ Hinge Doesn’t Fit
Look, the simple answer to are hinges interchangeable between brands is usually ‘no, not really, and here’s why you shouldn’t bet on it’. It’s not like the screws on your IKEA furniture where they seem to have a universal thread. Hinges are designed with specific measurements and tolerances that, while appearing similar across the board, are actually quite particular. The main players here are the pin diameter, the barrel length, the screw hole placement, and the radius of the corners.
Get even one of these slightly off, and your door will bind, sag, or simply refuse to close flush. I learned this the really annoying way when I was rehabbing an old dresser.
The original hinges had a specific leaf thickness that you just don’t see on generic replacements. I ended up having to mortise out the wood deeper on one side and shim the other, which looked like a hack job. Never again.
Think about it from the manufacturer’s perspective. They’re producing thousands, if not millions, of these. They have production lines, specific tooling, and quality control.
While the style of a butt hinge might be standard – a flat leaf, a barrel, another flat leaf – the actual dimensions are often proprietary or adhere to very specific, but not always obvious, standards. For instance, the thickness of the hinge leaf can vary.
This might seem minor, but if one hinge leaf is 2mm thick and the replacement is 2.5mm, that extra half-millimeter can be enough to prevent the door from seating correctly in its frame or recess. It’s these tiny discrepancies that drive me nuts. We’re not talking about rocket science here, but the precision matters.
Then there’s the screw hole pattern. Even if the overall size of the hinge seems right, the placement and size of the screw holes can be different. Some brands might use fewer screw holes, or the spacing might be slightly off. This means you’re either drilling new holes (which can weaken the wood if not done carefully) or you’re left with a hinge that isn’t as secure as it should be.
I once bought what I thought was a direct replacement for a cabinet hinge, and the screw holes were a good quarter-inch off. I had to fill the old ones and redrill, and even then, the wood split a bit because it was old pine. So, while they might look identical from across the room, up close and in practical application, the differences become glaringly obvious.
The goal is a smooth fit, not a Frankenstein of mismatched parts.
What to Look for: The Nitty-Gritty of Hinge Specs
So, if you can’t just grab any hinge that looks like the old one, what exactly should you be looking for? This is where you need to get your measuring tape out and have a bit of a detective mindset. First off, the most obvious measurement is the size of the hinge itself. You’re looking at the width of each leaf when the hinge is closed, and the length of the hinge barrel. Measure the old one. Are we talking about a 3-inch hinge? Is each leaf about 1.5 inches wide? What’s the length of the barrel, where the pin goes in? These are your starting points. But don’t stop there. (See Also: A Box Without Hinges Key )
The next important factor is the corner radius. Most modern hinges have either a square corner or a rounded corner. If your door jamb and door are cut for a rounded corner, you must get a hinge with a rounded corner. Trying to force a square-cornered hinge into a rounded mortise, or vice-versa, is a recipe for disaster and looks terrible. It’s like trying to fit a square peg in a round hole, but with wood and metal. I’ve seen people try to file down the corners to make them fit, which usually results in a weak spot and a hinge that’s more likely to fail.
Then there’s the pin. Is it a removable pin? Can it be secured with a security clip or stud? This is more of a functional choice, but it’s part of the overall hinge design.
Also, consider the weight rating and the material. While most residential doors use standard steel or brass hinges, if you have a heavy solid-core door or a gate, you’ll need a heavier-duty hinge.
Trying to use a lightweight hinge on a heavy door is just asking for trouble. You’ll notice sagging and premature wear. For example, I had a solid oak interior door that kept sagging until I upgraded to 4-inch, 5-knuckle, heavy-duty steel hinges. The cheap, standard ones just couldn’t handle the weight, no matter the brand.
Here’s a quick rundown of what to measure and consider:
| Measurement/Feature | What to Look For | Why It Matters | My Verdict |
|---|---|---|---|
| Leaf Width (each) | Match the old hinge exactly. | Determines how much wood the hinge sits in. Too wide, it won’t seat. Too narrow, less surface area for screws. | Must match. No wiggle room. |
| Hinge Length | Match the old hinge exactly. | Overall door support. Too short can lead to sagging. | Must match. |
| Barrel Length | Match the old hinge. | Affects how the door swings and closes. Small differences can cause binding. | Important for smooth operation. |
| Corner Radius | Square or Rounded. | Must match the mortise cut in the door and frame. | A must. Mismatched corners look bad and can cause issues. |
| Screw Hole Count/Placement | Ideally, match the old one. | Affects security and stability. Mismatched holes mean drilling new ones. | Best to match. If not, plan for new holes. |
| Leaf Thickness | Subtle but important. | Affects how flush the hinge sits. Can prevent the door from closing properly. | Often overlooked, but can be a deal-breaker. |
Common Mistakes and Why They’re Costly
The biggest mistake people make, myself included, is the assumption that all hardware is created equal. You see a hinge, you think ‘hinge’, and you buy it.
This is especially true when you’re in a pinch, like when a hinge snaps and your door is hanging awkwardly. The temptation to just grab the first thing that looks similar is immense.
But, as I’ve learned, that ‘fix’ often creates more problems than it solves. You might save a few bucks upfront, but you’ll likely spend more time and money fixing the resulting issues. I once tried to save money by buying a bulk pack of cheap hinges for a whole set of interior doors. Within a year, three of them were already showing signs of wear, the pins were loose, and the doors were sagging noticeably.
The ‘savings’ vanished when I had to buy better quality ones and potentially repair the door frames.
Another common blunder is not accounting for the type of door and its environment. Are you replacing hinges on an interior closet door, a heavy exterior door, a shed door, or a cabinet door? Each has different requirements.
An exterior door, for example, needs weather-resistant hinges (like stainless steel or coated steel) and often more solid construction to handle the elements and potentially higher security needs. Using interior-grade hinges on an exterior door is a recipe for rust and failure. Similarly, a flimsy hinge on a heavy solid-core door will warp and sag, making the door difficult to operate and eventually damaging the frame. (See Also: Are Integrated Washing Machine Door Hinges Standard )
I saw a friend install basic utility hinges on his heavy garden gate. Within a season, the gate was dragging on the ground because the hinges couldn’t handle the constant stress and weight.
People also often forget about the knuckle count of a hinge. A standard door hinge has two knuckles. However, heavier doors or those requiring extra stability might use a three-knuckle or even a five-knuckle hinge. The extra knuckles provide additional support and distribute the weight more evenly. If you replace a five-knuckle hinge with a standard two-knuckle one, you’re asking for trouble. It’s like trying to hold up a heavy shelf with just two small brackets when it needs four. You might get it to fit, but it won’t be stable, and it will eventually fail. This is one of those details that seems minor until the door starts to droop.
Finally, there’s the issue of finish. While not strictly a functional interchangeable point, if you’re only replacing one hinge on a set and you want it to look right, matching the finish is important. If you have oil-rubbed bronze hinges and you put a shiny chrome one next to it, it’s going to look jarring. While this is purely aesthetic, it’s a mistake that impacts the overall look and feel of your room. It’s the little details that make a space look polished, not cobbled together.
Real-World Use: When a Swap might Work (and When It Won’t)
Let’s be honest, there are situations where swapping hinges between brands might work, but they are the exception, not the rule. This generally applies to the most basic, utilitarian hinges where manufacturers adhere to very strict, universal standards. Think of basic utility hinges – the simple, flat, often unadorned hinges you might find on a cheap interior closet door or a utility shed. These are often made to very basic ANSI (American National Standards Institute) or BHMA (Builders Hardware Manufacturers Association) specifications for size and hole placement. However, even within these ‘standard’ categories, there can be subtle variations. For instance, the ANSI Grade 1, 2, or 3 ratings indicate durability, but not necessarily exact dimensional interchangeability across every single manufacturer.
My own experience tells me that if you’re dealing with very old hardware, or hardware from smaller, artisanal manufacturers, interchangeability is practically zero. These are often made with custom dies or specific historical dimensions that you won’t find on modern, mass-produced hinges. Conversely, if you’re buying a hinge from a brand like Stanley, Schlage, or Baldwin, and you’re replacing an identical hinge from the same brand, then yes, they are interchangeable because they are made to the same specifications. The problem arises when you try to mix brands, or even different product lines within the same brand.
Here’s a contrarian take: Everyone says you can just measure the old hinge and buy a new one, and for the most part, that’s technically true for basic dimensions like length and width. I disagree because it ignores the important factors like corner radius, screw hole alignment, and leaf thickness that I’ve hammered home.
These small variances are the ones that cause the frustration. People get fooled by the overall size and then wonder why the door binds or the hinge sticks out.
It’s like buying a suit that fits your chest and shoulders but is too tight in the waist; it’s technically ‘your size’ but it doesn’t fit correctly. You need all the measurements and details to be right for a true, functional fit. Therefore, my advice is almost always to stick with the original manufacturer if possible, or at least a direct equivalent from a reputable brand that guarantees exact specifications.
The only time I’d feel reasonably confident mixing brands is if I was dealing with brand-new installations where I was cutting the mortises myself. In that scenario, I could precisely cut the wood to fit whatever hinge I chose, regardless of brand. But for replacements? It’s a gamble I’m rarely willing to take anymore. The peace of mind knowing it will fit perfectly is worth the slight extra effort of finding the exact match.
Practical Tips for a Smooth Swap
Alright, so you’ve decided you need to replace a hinge, and you’re determined to get it right. Here’s how to approach it without pulling your hair out. First, and I cannot stress this enough, document the old hinge. Take clear, well-lit photos of it from multiple angles. Get close-ups of the screw holes. Better yet, take the old hinge off (if possible without damaging the door or frame) and take it with you to the hardware store. This is the ultimate guarantee.
If you can’t take the old hinge with you, your measuring tape is your best friend. As I’ve detailed, measure the length, the width of each leaf, and the barrel length. Pay very close attention to the corner radius – is it square or rounded? If rounded, try to gauge the radius. Most hardware stores carry hinges with standard corner radii (like 1/4 inch or 5/8 inch). If the old one looks significantly different, you might be in for more work than you anticipated. (See Also: Are Hinges Wheeels )
When you’re at the store, compare the hinge you’re looking at to your measurements and photos. Don’t just trust the packaging that says ‘3-inch hinge’. Look at the actual dimensions. Check the screw hole pattern and count. If you’re buying online, scour the product description and look for detailed diagrams with measurements. Some manufacturers will even provide spec sheets that you can compare. Websites like Rockler or Lee Valley often have very detailed product information for woodworking hardware, which can be a lifesaver.
Consider the screw type and size. Often, hinges come with wood screws. Make sure they are appropriate for the type of wood and the weight of the door. If your old screws were particularly long or short, that might indicate a specific requirement or a previous modification. If the new hinge comes with screws that look too small or short for the job, buy better ones. It’s a small cost for increased security and stability.
Finally, if you’re replacing a hinge on a door that’s already installed and operating, take the time to identify why it failed. Was it a manufacturing defect, or was it simply not rated for the load? If a hinge failed under normal use, you likely need a heavier-duty option. Don’t just replace it with the same thing; upgrade if the situation warrants it. This proactive approach will save you headaches down the line. For instance, if a hinge on a kitchen cabinet door is sagging because the door is heavy and constantly used, opt for a heavier gauge steel hinge with more screw holes. It’s a small investment that pays off in durability.
People Also Ask: Answering Your Burning Hinge Questions
Can I Use Any Hinge on Any Door?
No, absolutely not. Doors have specific requirements based on their weight, material, and how they hang. Using the wrong hinge can lead to binding, sagging, premature wear, or the door simply not closing correctly. Always match the hinge dimensions, corner radius, and load capacity to the door and frame.
What If the Screw Holes Don’t Line Up?
If the screw holes don’t line up perfectly, you have a few options, none of which are ideal for a perfect repair. You can try to drill new holes, but this risks damaging the wood if not done carefully. You can fill the old holes with wood putty or dowels and then redrill. Or, you can use a hinge that requires fewer screws, but this will compromise stability. Ideally, you want to find a hinge with matching screw hole placement.
Are Hinges Universal Size?
No, hinges are not a universal size. While there are common industry standards for basic butt hinges (like 3-inch or 4-inch lengths), the width of the leaves, the barrel length, the corner radius, and the screw hole patterns can vary significantly between brands and even product lines within the same brand. Always measure carefully.
How Do I Know What Kind of Hinge to Buy?
You need to identify the type of hinge you’re replacing. Look at its size (length, leaf width), corner radius (square or rounded), material (steel, brass, stainless steel), and intended use (interior, exterior, cabinet, heavy-duty). The best approach is to measure the old hinge or take it with you to the store. If it’s a new installation, consider the weight and swing of the door.
Verdict
So, to circle back to the big question: are hinges interchangeable between brands? My honest, hard-earned answer is: don’t bet on it. While the basic concept of a hinge is universal, the execution and the precise measurements are brand-specific enough to cause serious headaches if you try to mix and match carelessly. The money saved on a slightly cheaper, non-matching hinge is almost always lost in time, frustration, and potentially damaged wood.
The best strategy? Whenever possible, try to identify the original manufacturer of your hardware. If that’s not an option, meticulously measure everything you can about the existing hinge – dimensions, corner radius, screw holes – and then scour product descriptions for exact matches. Don’t be afraid to take the old one with you to the store. It might seem like a bit of extra effort, but a perfectly fitting hinge is a small victory that makes a surprisingly big difference in how your doors operate and look.
Next time you’re faced with a broken hinge, take a deep breath, grab your measuring tape, and remember these lessons. Your doors will thank you.